


Learning colposcopy
Colposcopic appearance of normal cervix
The colposcopic examination
Detection of infections & benign conditions of cervix
Detection of cervical neoplasias
Treatment of cervical intraepithelial neoplasia
Treatment by cryotherapy
Treatment by thermal ablation
Treatment by LLETZ (LEEP)
Treatment by cold-knife conization (CKC)
Cases
Normal
Squamous metaplasia and ectropion
Inflammation and cervicitis
Low grade
High grade
Early and advanced cancers
Miscellaneous
Post treatment
Search with IFCPC criteria
Search with Swede score criteria
Quiz Foreword
Acknowledgement
Authors
Suggested citation
Home
Atlas of Colposcopy: Principles and Practice
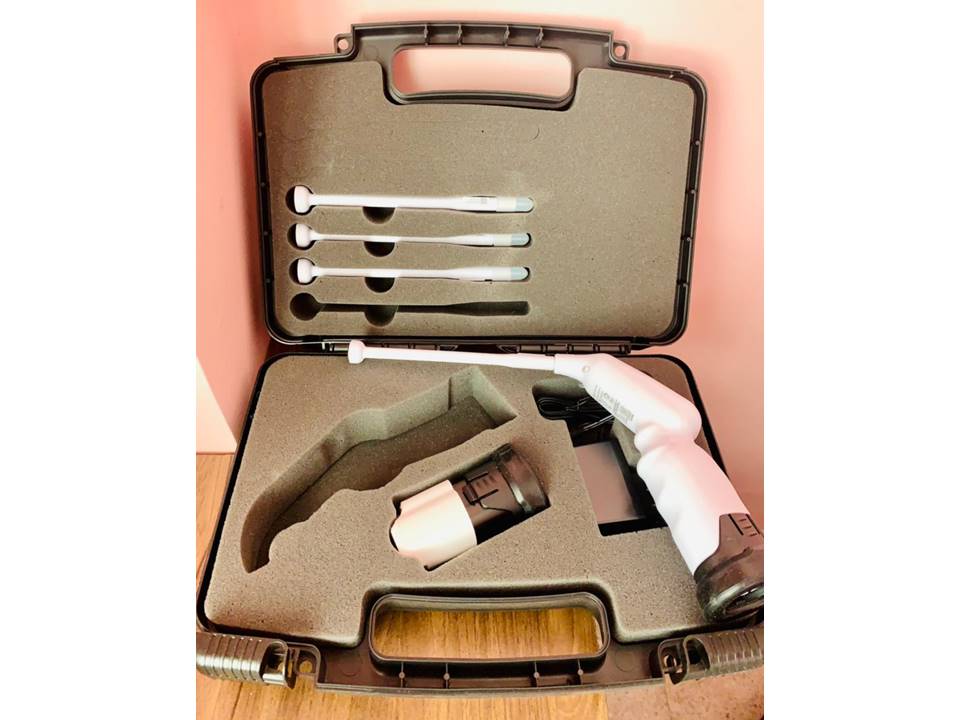
Filter by language: English / 中文 / Français / Español / Português / Русский| Treatment by thermal ablation The battery-operated model |
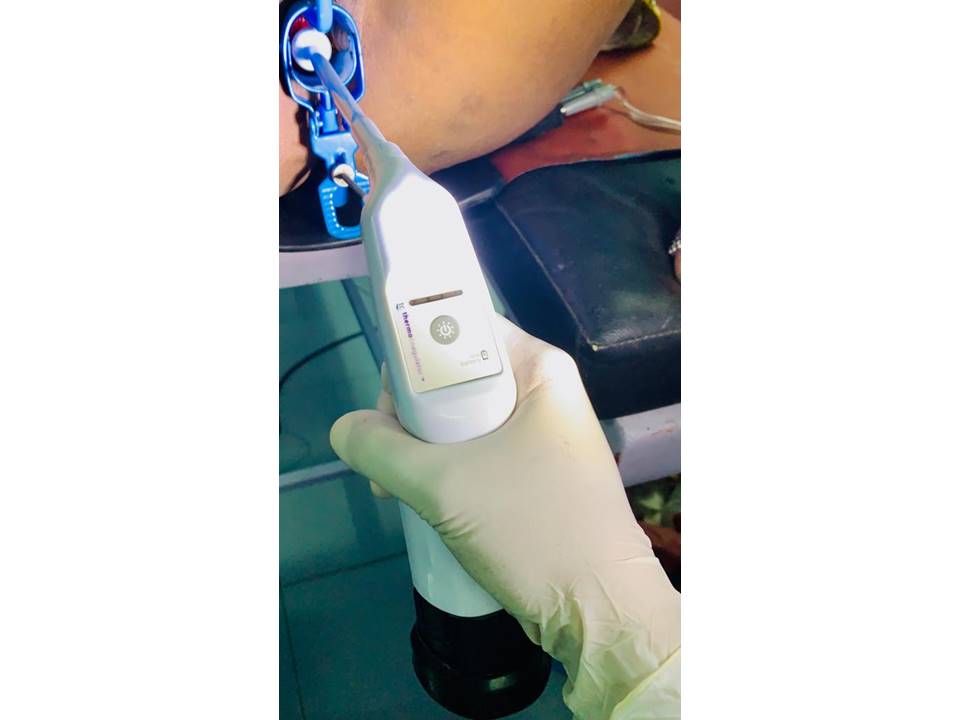
The lightweight (weight, ~250 g) compact variety of thermal ablator is powered by a rechargeable lithium-ion battery. The machine has a built-in light to visualize the cervix and an activation button to switch it on and off. The machine can be pre-set to different treatment timings (20 s, 30 s, or 40 s) and the desired temperature (100 °C). The procedure timing is automated, which means that treatment automatically stops at the end of the pre-set time and there is a visual and audible indicator. The machine includes multiple reusable probes with tips of 16 mm and 19 mm in diameter. The tip may be flat or have a small projection (nipple) at its centre. The probe can be fitted to the machine by the probe connector, which is covered with a silicone cap when the machine is not in use. A battery charger is included in the pack.
Setting up the battery-operated ablator: Step 1: Charging the battery
Step 2: Getting the machine ready Insert a charged battery into the handle of the unit by pushing the battery into place until you feel the locking tabs snap (the battery can be inserted only when correctly orientated). Select the probe of the desired size, and remove the silicone cover from the connector. Insert the probe connector into the front of the unit. Ensure that the probe is tightly inserted. If the probe is not securely connected, the machine will power on briefly and shut itself off. Step 3: Turning the machine on Turn on the machine by pressing the ON/OFF button located on a panel on the handle. The green LED on the panel and the white illumination LED at the front are turned on. One blue light on the panel will flash, indicating that unit is ready to be used (the tip is not heated yet). Step 4: Heating the probe Press the ON/OFF button a second time to start heating the probe tip. Four blue timer LEDs on the panel will flash for a few seconds, indicating that the tip has begun heating. When the tip has heated to 100 °C (within a few seconds), the blue timer LEDs stop flashing and a single beep is audible. Treatment can now begin. Step 5: Treatment cycle Once the treatment cycle is running, the blue timer LEDs turn off with an audible beep, one at a time, after each quarter of the procedure has finished. When all four blue timer LEDs are turned off, a longer beep is audible, indicating that the unit is no longer applying heat and has commenced its cool-down cycle. Once the cool-down cycle is complete, the front white LED lights will turn off, and the probe may then be removed from the treatment area. If a second treatment area is indicated, repeat the above steps before removing the probe. NOTE: The battery is removed by compressing the two locking tabs on the sides near the battery base to release the lock and, while firmly holding the unit head, pulling the battery down and out of the handle. A mobile thermal ablation device can perform 3060 procedures per battery charge. When the battery is low, a yellow LED indicator will illuminate. The battery in the unit should be replaced with a charged battery soon after the low battery indicator is illuminated. |

25 avenue Tony Garnier CS 90627 69366, LYON CEDEX 07 France - Tel: +33 (0)4 72 73 84 85
© IARC 2024 - Terms of use - Privacy Policy.
© IARC 2024 - Terms of use - Privacy Policy.